Table of Contents
Simple Basic Stresses
Introduction to Stresses
Stresses build up in machine elements as a result of applied load, and machine design comprises ensuring that the elements can withstand the induced stresses without yielding. Consider a basic lever, as illustrated in the figure below.
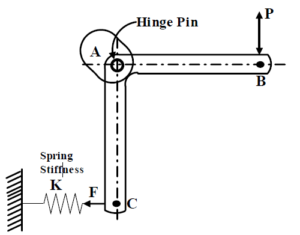
A well-designed spring would guarantee that the lever end B has the required force P. If the material is properly selected, the stresses developed in sections AB and AC will determine the ideal cross-section of the lever. The stresses generated by the reaction forces at point A determine the hinge’s design. Upon closer inspection, the arrangement would show that various elements create the following kinds of stresses:
Lever arms AB and AC – Bending stresses
Hinge pin – Shear and bearing stresses.
Spring – Shear stress.
This makes it necessary to know the effects of these and other basic stresses.
Some Simple Basic Stresses
Tensile stress
The stress developed in the bar ( figure-below) subjected to tensile loading is given by σ=P/A.

Compressive stress
The stress developed in the bar ( figure-below) subjected to compressive loading is given by σ=P/A.
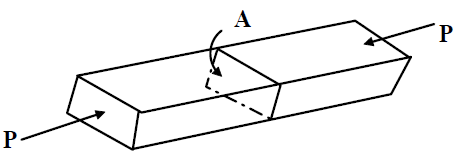
In the present situation, the resultant force working perpendicular to the cross-section A corresponds to the force P. However, the normal stress perpendicular to the section is as follows if we examine the stresses on an inclined cross-section B (figure below).

 and shear stress parallel to the section is given by.
Bearing stress
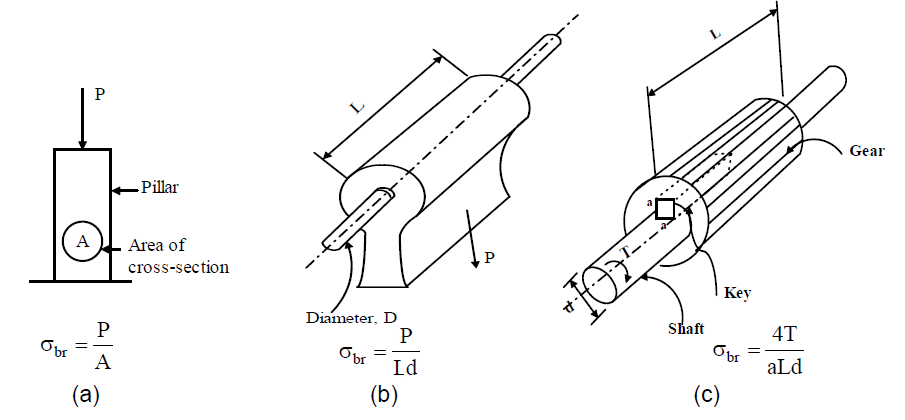
When a body is pressed against another, the compressive stress developed is termed bearing stress.
For example, bearing stress developed at the contact between a pillar and ground, at the contact surface between a pin and a member with a circular hole, and at the faces of a rectangular key fixing a gear hub on a shaft are shown in figure below.
 Shear stress
When forces are transmitted from one part of a body to other, the stresses developed in a plane parallel to the applied force are the shear stresses ( figure below) and the average values of the shear stresses are given by τ=P/A (single shear and τ=P/2A (double shear) series.

In design problems, critical sections must be considered to find normal or shear stresses. We consider a plate with holes under a tensile load (figure-below) to explain the concept of critical sections.
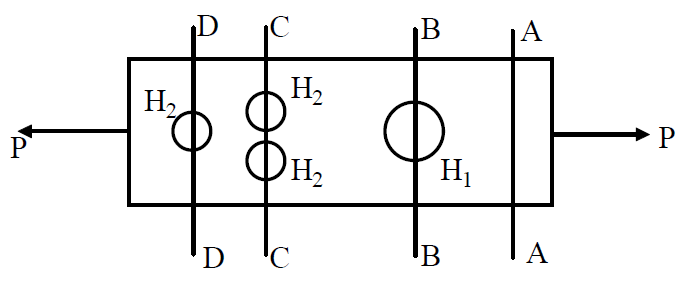
Let the cross-sectional area of the plate, the larger hole H1 and the smaller holes H2 be A, a1, a2 respectively. If 2a2 > a1 the critical section in the above example is CC and the average normal stress at the critical section is σ=P/(A-2a2)
Bending of Beams
Bending stresses
Consider two sections ab and cd in a beam subjected to a pure bending. Due to bending the top layer is under compression and the bottom layer is under tension. This is shown in figure below. This means that in between the two extreme layers there must be a layer which remains un-stretched and this layer is known as neutral layer. Let this be denoted by NN′.
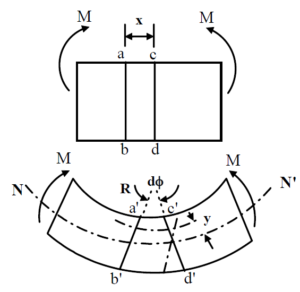
We consider that a plane section remains plane after bending- a basic assumption in pure bending theory. If the rotation of cd with respect to ab is dφ the contraction of a layer y distance away from the neutral axis is given by ds=y dφ and original length of the layer is x=R dφ, R being the radius of curvature of the beam. This gives the strain ε in the layer as ε=y/R. We also consider that the material obeys Hooke’s law σ = Eε. This is another basic assumption in pure bending theory and substituting the expression for ε we have σ/y=E/R.
Consider now a small element dA y distance away from the neutral axis. This is shown in the figure represented below.
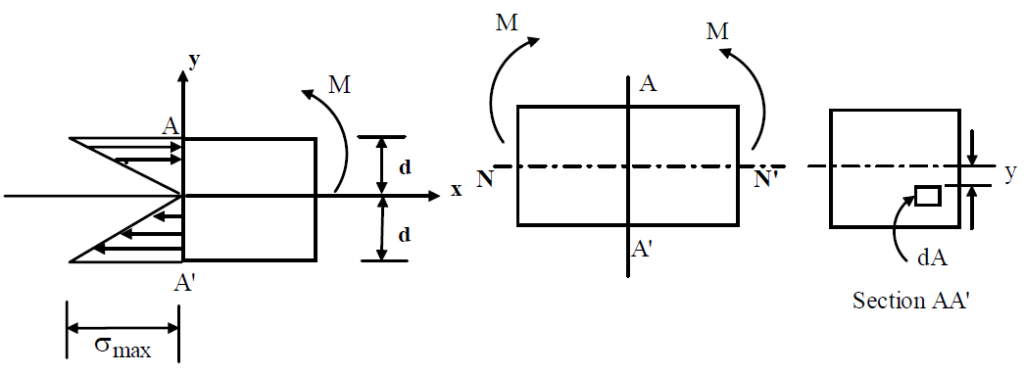
Axial force on the element dFx= σx.dA and considering the linearity in stress variation across the section we have σx/σmax=y/d, where σx and σmax are the stresses at distances y and d respectively from the neutral axis. The axial force on the element is thus given by dFx= (σmax/d)ydA. For static equilibrium total force at any cross-section F=∫ (σmax/d)ydA=0 This gives ∫ ydA = yA = 0 and since A≠ 0, y = 0.This means that the neutral axis passes through the centroid.
Again for static equilibrium total moment about NA must the applied moment M. This is given by ∫ (σmax/d)ydA= M and this gives σmax=Md/I. For any fibre at a distance of y from the centre line we may therefore write σ=My/I We therefore have the general equation for pure bending as 
Shear stress in bending
In an idealized situation of pure bending of beams, no shear stress occurs across the section. However, in most realistic conditions shear stresses do occur in beams under bending. This can be visualized if we consider the arguments depicted in figure below.


When bending moment changes along the beam length, layer AC12 for example, would tend to slide against section 1243 and this is repeated in subsequent layers. This would cause interplanar shear forces F1 and F2 at the faces A1 and C2 and since the force at any cross-section is given by , we may write
  and
and  Here M and dM are the bending moment and its increment over the length dx and Q is the 1st moment of area about the neutral axis. Since shear stress across the layers can be given by τ=VQ/It, and shear force is given by dF=dM/dx, we may write τ=dF/tdx.
Torsion of circular members
A torque applied to a member causes shear stress. In order to establish a relation between the torque and shear stress developed in a circular member, the following assumptions are needed:
1. Material is homogeneous and isotropic
2. A plane section perpendicular to the axis of the circular member remains plane even after twisting i.e. no warping.
3. Materials obey Hooke’s law.
Consider now a circular member subjected to a torque T as shown in figure
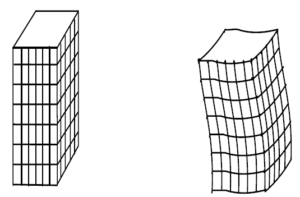
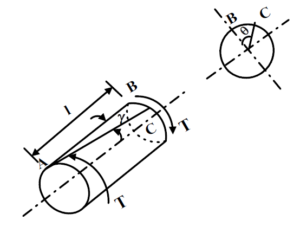 The assumption of plane section remaining plane assumes no warping in a circular member as shown in figure
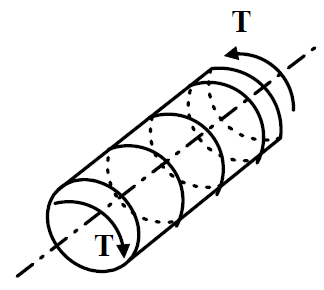 However, it has been observed experimentally that for non-circular members warping occurs and the assumption of plane sections remaining plane does not apply there. This is shown in figure
  Let the point B on the circumference of the member move to point C during twisting and let the angle of twist be θ. We may also assume that strain γ varies linearly from the central axis. This gives γl =rθ and from Hooke’s law γ=τ/G, where τ is the shear stress developed and G is the modulus of rigidity. This gives τ/r=Gθ/l.
Consider now, an element of area dA at a radius r as shown in figure below. The torque on the element is given by T = ∫ τrdA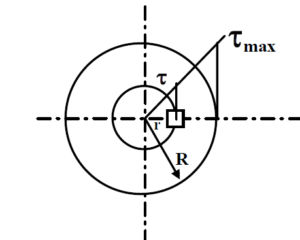
For linear variation of shear stress we have combining this with the torque equation we may write
 ![]() Now
Now ![]() may be identified as the polar moment of inertia J. And this gives
may be identified as the polar moment of inertia J. And this gives ![]() Therefore for any radius r we may write in general
Therefore for any radius r we may write in general ![]() We have thus the general torsion equation for circular shafts as
We have thus the general torsion equation for circular shafts as 
Buckling
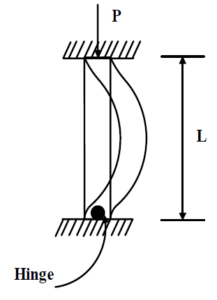
The compressive stress of P/A is applicable only to short members but for long compression members there may be buckling, which is due to elastic instability. The critical load for buckling of a column with different end fixing conditions is given by Euler’s formula  where E is the elastic modulus, I the second moment of area, l the column length and n is a constant that depends on the end condition. For columns with both ends hinged n=1, columns with one end free and other end fixed n=0.25, columns with one end fixed and other end hinged n=2, and for columns with both ends fixed n=4.
References
- ABDULLA SHARIF, Design of Machine Elements, Dhanpat Rai Publications (P) Ltd, New Delhi, 1995
- V. B. Bhandari, Design of Machine Elements, Third Ed., The McGraw-Hills Companies, New Delhi
- R. S. KHURMI and J.K. GUPTA, A Text-Book of Machine Design, S.Chand and company ltd., New Delhi, 2000. Design of Machine Elements https://nptel.ac.in/courses/112/105/112105125/
Q & A
[PDF Format] [Video Lecture]
/
